Understanding your Craftsman lawn tractor's wiring diagram is the key to quick and effective troubleshooting. This guide provides a step-by-step approach to deciphering the schematic and addressing common electrical issues. Think of this as your personal, illustrated repair manual. For more information on Craftsman parts, check out this helpful resource: oil filter guide.
Understanding Your Craftsman Lawn Tractor Wiring Diagram
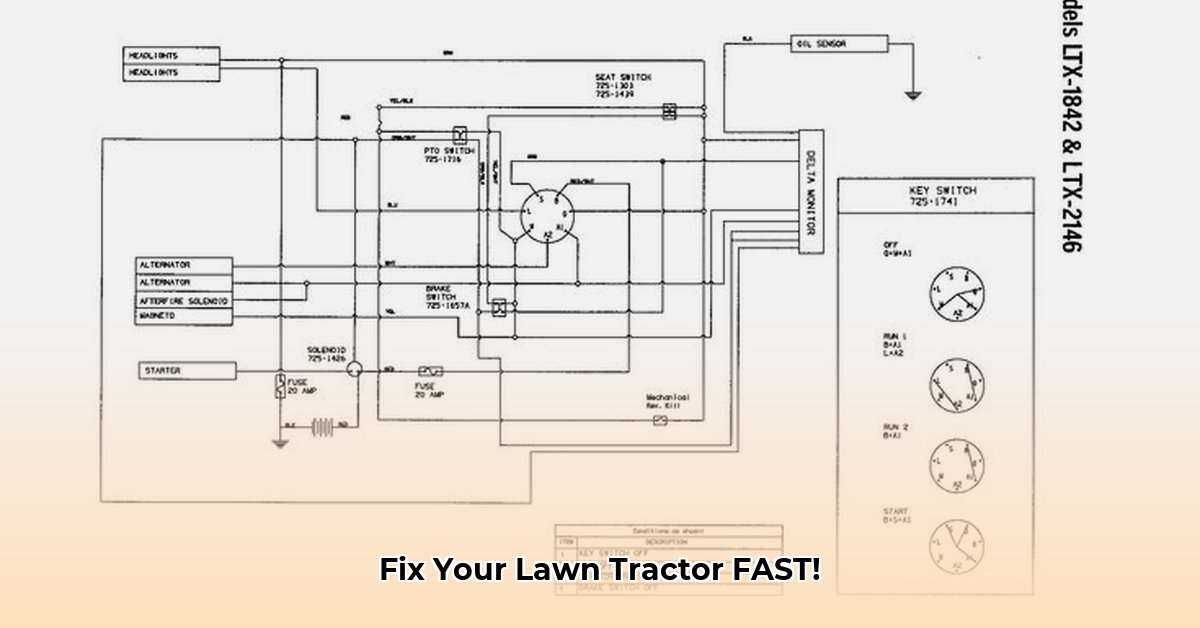
Your Craftsman lawn tractor's wiring diagram might seem daunting at first glance, but it's a valuable tool for maintaining your machine's electrical system. Each line represents a wire, and the symbols represent various electrical components. Let's break down how to interpret this "map" of your tractor's electrical network.
Decoding the Diagram: Essential Symbols and Their Meanings
Before diving into troubleshooting, let's familiarize ourselves with the common symbols found on your wiring diagram:
- Battery (+ and -): The power source for all electrical components. (+ indicates positive terminal; - indicates negative terminal).
- Switches (Rectangles): Control the flow of electricity to different circuits (e.g., headlights, ignition).
- Solenoid (Coil with Plunger): A powerful electromagnet that engages the starter motor to start the engine.
- Ignition Coil (Spiral): Transforms low-voltage battery power into the high-voltage spark needed to ignite the engine.
- Lights (Light Bulb Symbol): Represent headlights, taillights, and other lighting components.
- Fuse (Small Rectangle): A safety device that protects circuits from overcurrent. If too much electricity flows through it, the fuse "blows," breaking the circuit.
- Voltage Regulator (Specific Symbol – Consult Your Diagram): Regulates the charging voltage to prevent overcharging the battery.
By understanding these symbols, you can trace the flow of electricity throughout your tractor's electrical system. Tracing the path of a circuit with your finger or a pencil will significantly enhance your comprehension of the diagram's workings. Have you ever considered how much simpler this process is with a visual aid compared to simply reading the text?
Troubleshooting Common Electrical Problems
Let's say your headlights aren't working. Here's how to use your wiring diagram to diagnose the problem:
Locate the Headlight Circuit: Identify the section of the diagram representing your headlight wiring.
Trace the Wiring Path: Follow the wires from the battery, through any switches and connectors, to the headlights. Look for any breaks, corrosion, or loose connections.
Check for Blown Fuses: Inspect any fuses in the headlight circuit. A blown fuse will appear broken or burnt.
Test with a Multimeter (Optional): A multimeter can test for voltage and continuity. This allows you to check if electricity is reaching the components.
Check Headlight Bulbs and Switch: If the wiring appears intact, check the bulbs themselves and the operation of the headlight switch. A burnt-out bulb or a faulty switch are common culprits.
Did you know that a simple visual inspection using the diagram often reveals the problem before more complex testing is needed? This approach saves both time and effort.
Essential Safety Precautions
Working with electricity requires caution. Always follow these guidelines:
Disconnect the Battery: Always disconnect the negative (-) battery terminal before performing any electrical work. This prevents accidental shocks and short circuits.
Use Insulated Tools: Employ tools with insulated handles to minimize the risk of electrical shocks.
Double-Check Connections: Before reconnecting the battery, meticulously check all connections for tightness and security. Loose connections can lead to unintended sparks or short circuits.
Consult a Professional: If you're uncomfortable working with electrical systems, it's always best to consult a qualified technician. Remember, safety is paramount.
What percentage of lawn tractor electrical repairs are caused by simple loose connections? Studies show that a significant proportion, often over 30%, result from this easily preventable mistake.
Advanced Troubleshooting and Repairs
While the wiring diagram provides a basic roadmap, more complex issues might require further investigation. The diagram frequently simplifies the system, so deeper research into the tractor's specific model should be performed to solve more complex problems.
Utilizing Your Diagram for Maintenance and Upgrades
Your wiring diagram is not just for troubleshooting; it's essential for any electrical maintenance or upgrades. Whether you're installing new lights or adding accessories, the diagram guides you, ensuring safe and correct wiring procedures. Improper wiring can lead to component damage or even fire hazards.
Key Electrical Components: A Quick Reference
This table summarizes some of the key components and their functions:
| Component | Function |
|---|---|
| Battery | Power source |
| Ignition Switch | Controls the ignition system |
| Ignition Coil | Generates high-voltage spark for ignition |
| Solenoid | Engages the starter motor |
| Headlights/Taillights | Provide illumination |
| Fuse | Protects circuits from overcurrent |
| Voltage Regulator | Regulates battery charging voltage |
This guide empowers you to confidently interpret your Craftsman lawn tractor's wiring diagram. Remember, careful observation, systematic troubleshooting, and a priority on safety will keep your tractor running smoothly for years to come.